QuickBooks Bill Pay / Vendor Credits
Bringing vendor credits into the QuickBooks Bill Pay scheduling flow, so payments come out accurate and vendors are notified automatically.
To comply with my confidentiality agreement, some details and numbers are omitted.
- Role
- Design lead for vendor credits in QuickBooks Bill Pay, 2025–26. I owned it from framing the problem through a target-state concept and a focused, buildable V1.
- Where it landed
- Defined the end-to-end target state and a focused V1 scoped to the one flow that was actively broken.
Patterns
- End to end. The ask was just to apply credits while scheduling. I zoomed out to the whole user journey, from creating a credit, to applying it and to sending remittance, and designed the full target state before narrowing to a focused V1.
- Complex systems. Credits had to stay consistent across many surfaces and states, approvals, cancellations, and every screen and email that shows a payment, so I locked one model that keeps the math right everywhere and creates clarity for both the owner and the vendor.
What a vendor credit is
Vendor credits are credits that reduce the amount you owe a vendor. You can apply them to a specific invoice, or to the vendor’s overall account balance. Vendors issue them for all sorts of reasons: returned goods that were damaged, incorrect, or unwanted; damaged goods the customer keeps at a reduced price; compensation for poor service; a promotional discount toward a future purchase; or a simple overpayment, like being billed for the wrong quantity or paying an advance that turned out larger than the final invoice.
The problem
Vendor credits already exist in QuickBooks, but the Bill Pay workflow doesn’t support applying them while scheduling a payment, so customers must remember they have credits, apply them separately before paying, and then notify the vendor manually, for example, by email. This fragmented path leads to accounting mismatches, overpayment, confusion, and wasted time.
This was our top feature request, and our data showed it was a significant pain point: vendor credits were used by a large base of customers every month, and we could see that for a certain amount of payments, part of the bill was paid by credits and the other part outside QuickBooks. Our assumption was that we could bring back at least a third of those payments, and in parallel, reduce the six-figure annual support cost that I tracked during my research.
What customers told us
As part of my research, I analyzed several dozen pieces of VOC (voice of customer) feedback, and there were a few themes that emerged. Some of it was just about the general frustration: customers who thought they were blocked and moved to other tools or paper checks, customers who managed to achieve their goal but described long workarounds, and many who compared QuickBooks Online unfavorably to the QB desktop version. Then, there were specific asks: better ways to create credits, more control and automation when applying them, and sending automatic remittance advice to the vendor. These themes align perfectly with our three tasks in this feature: creating credits, applying them, and sending remittance.
Before
We have a lot of automation around bringing bills into the system, but for credits, the only way to add them, up until now, was manually. Once a credit was created, applying it was also manual, and lacked control over which credit is applied to which bill. To pay a bill with credits and then Bill Pay, you had to make a partial payment with the credits, save it, then pay the rest through Bill Pay. If you managed to figure out this part, you would have to send your vendor a separate remittance advice, once again, manually.
The target state
While the original task was to enable applying credits as part of the scheduling payments flow, in the target version we decided to address all three phases and all the different requests: an end-to-end experience, from creating a credit to applying it and sending automatic remittance, in such a way that the vendor is also clear on what happened.
To get a feel for the different options, I built multiple prototypes in Claude, and for a while, pretty much didn’t open Figma at all.
Meet Jordan
To make the target state concrete, imagine Jordan, who owns a small coffee chain with three locations. A delivery arrives from her vendor, Barnett Design, and one of five boxes of branded cups is damaged. She calls, and they agree to a $400 credit. Jordan easily creates that credit right from the original bill: she selects the damaged item, adjusts the description and amount, and the reference number and the rest of the details are created automatically, with the option to upload a PDF the same way she would for a bill.
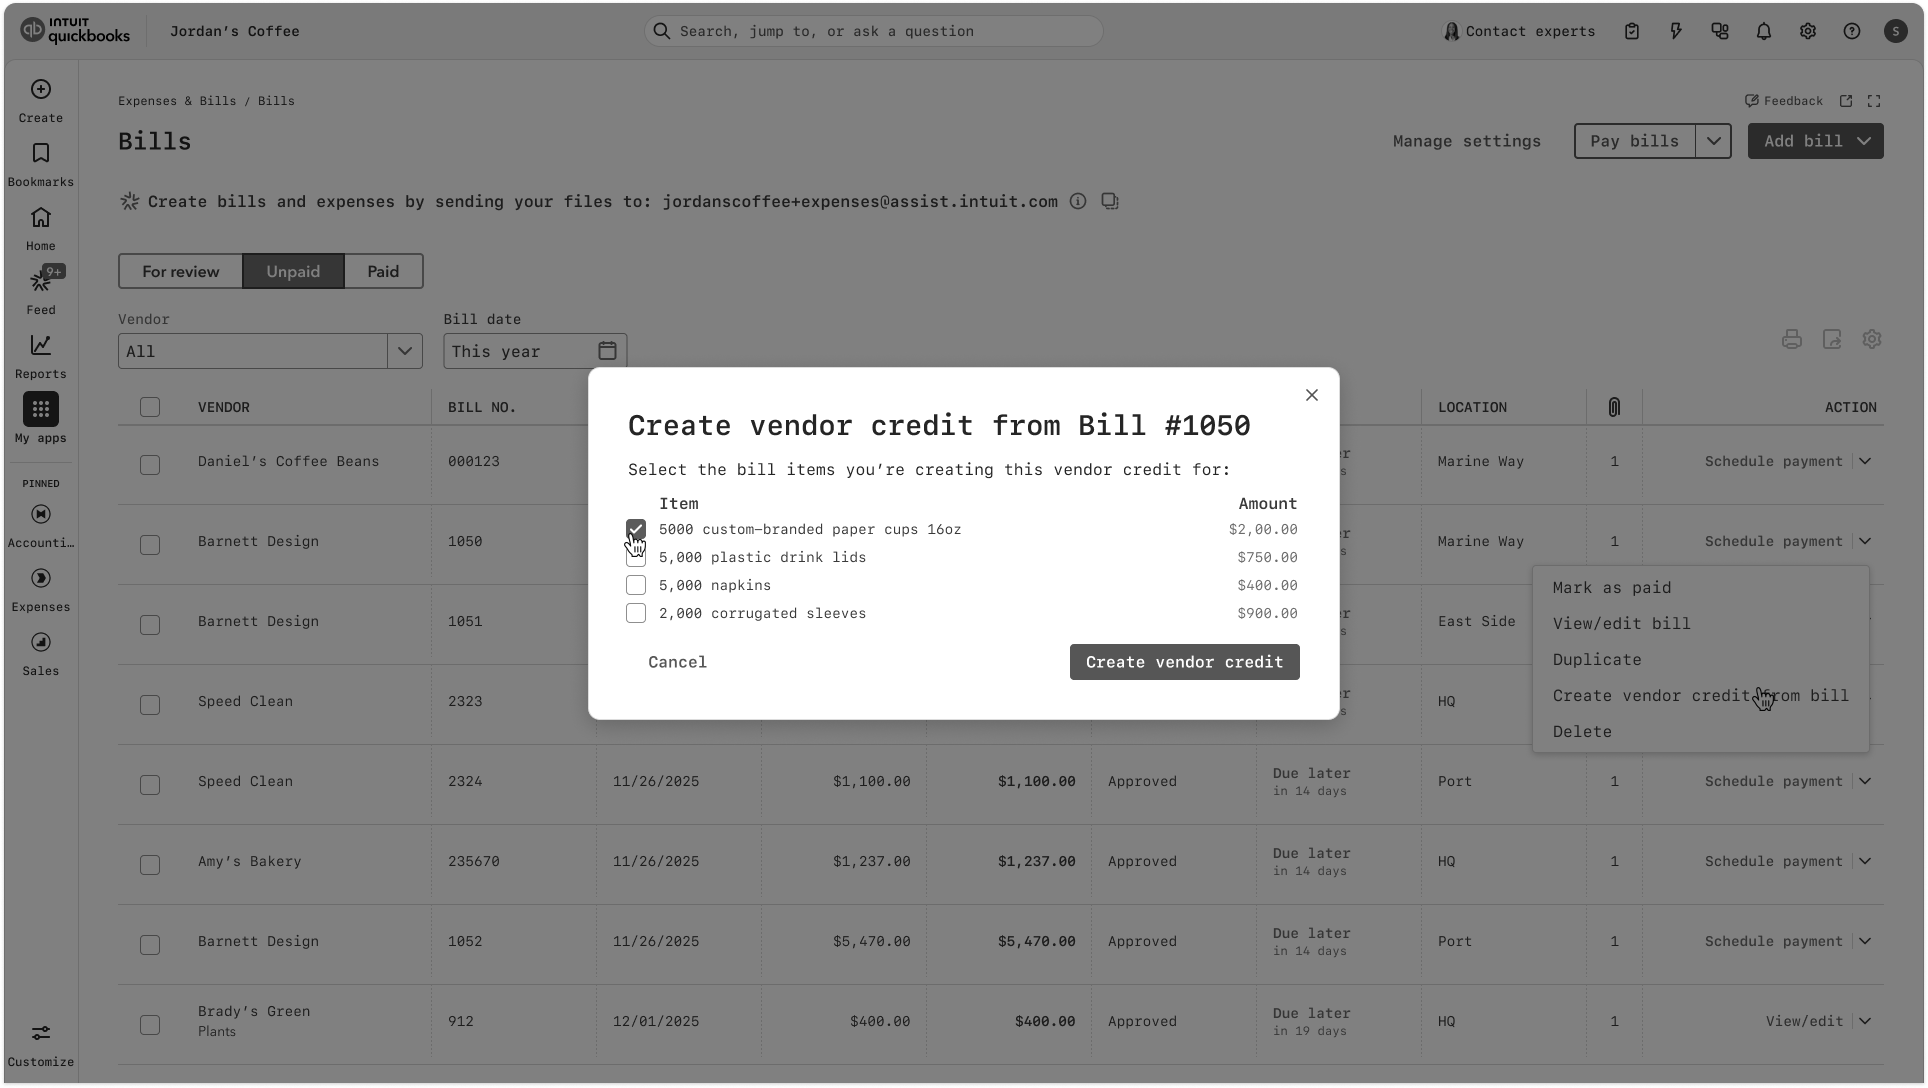
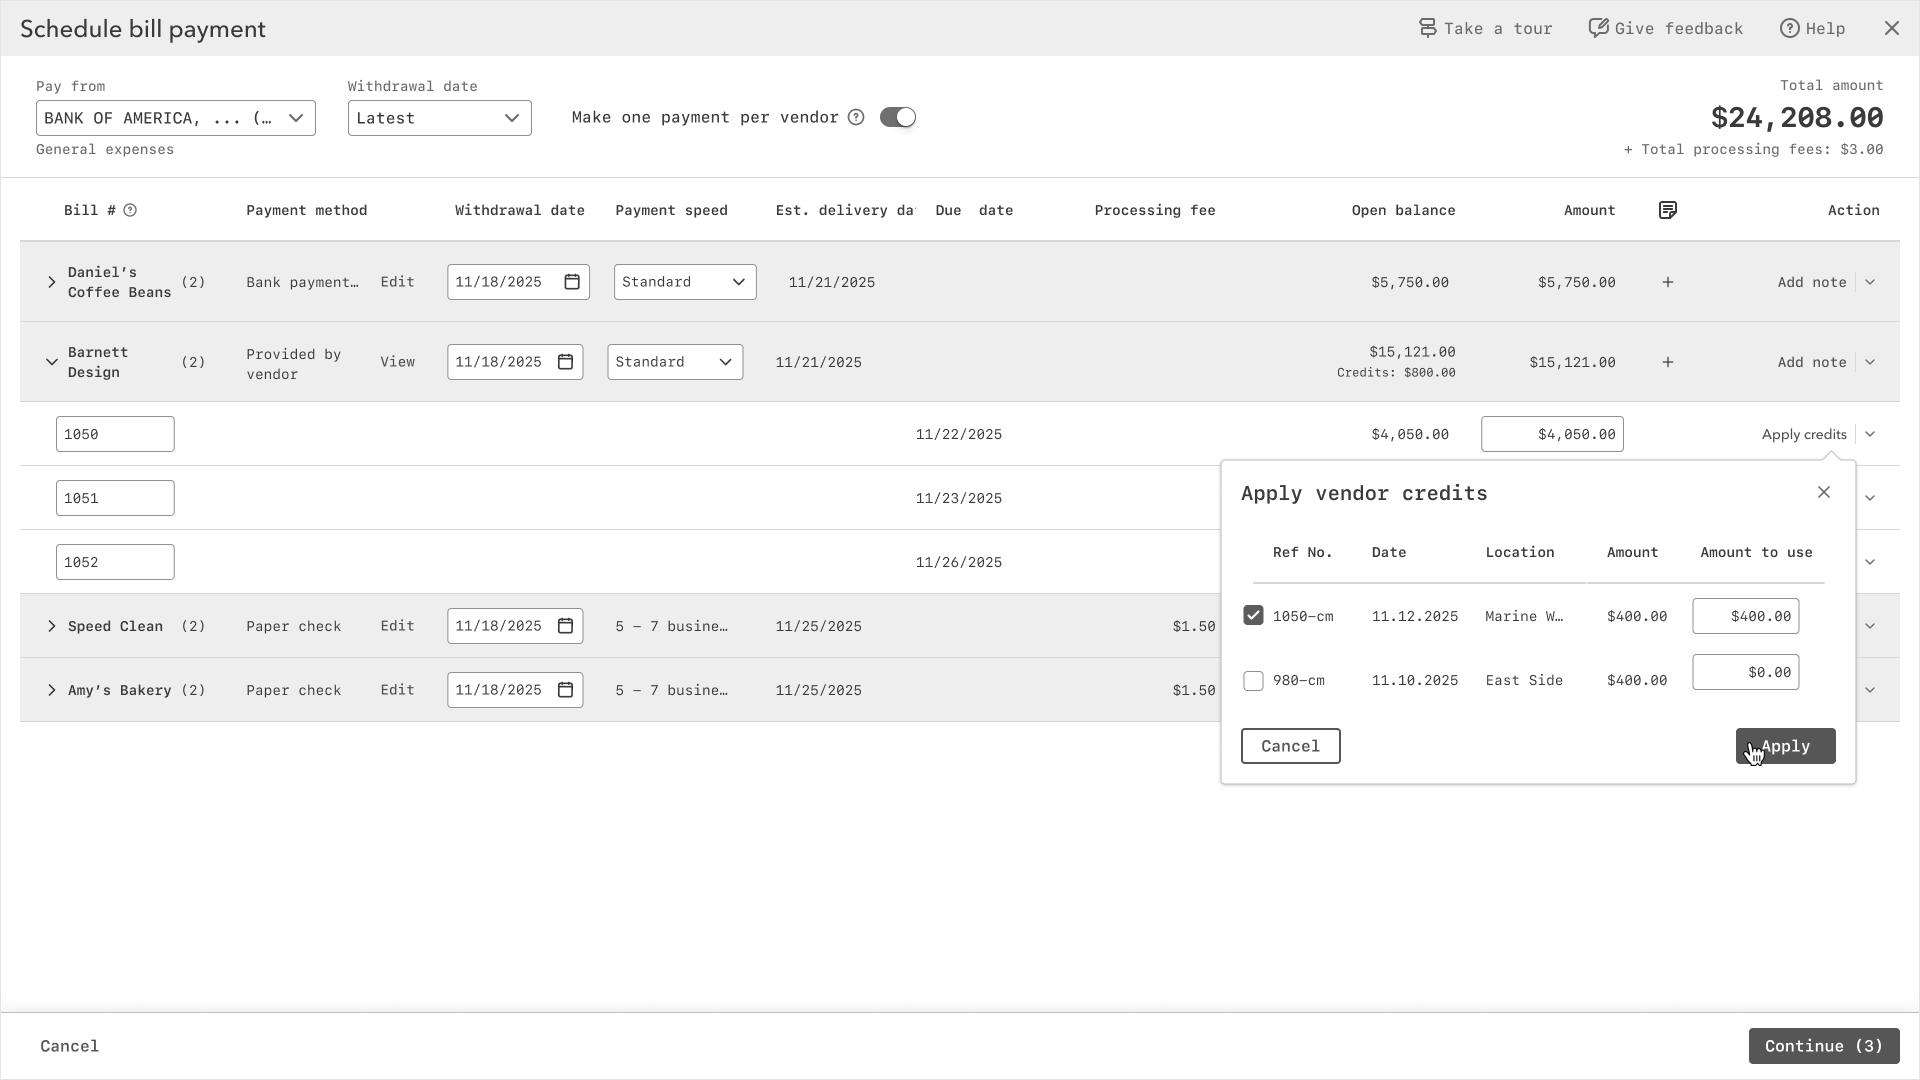
When she goes to schedule her payments, auto-apply settings have already matched her new credit and an older one to the right bills, with smart logic behind the scenes, and she can review or adjust the matches before scheduling. Once the payment is scheduled, the vendor gets remittance advice automatically, including the details of all credits applied.
Starting with V1
Vendor credits surface in a lot of places across AP management and Bill Pay, so V1 had to start somewhere concrete. We chose a page called Pay Bills, for two reasons: it’s where roughly a third of Bill Pay payments get scheduled, and it’s the one flow where the experience is actively broken, since a customer can enter a credit for an offline payment but gets an error if they try to schedule from this page with Bill Pay.
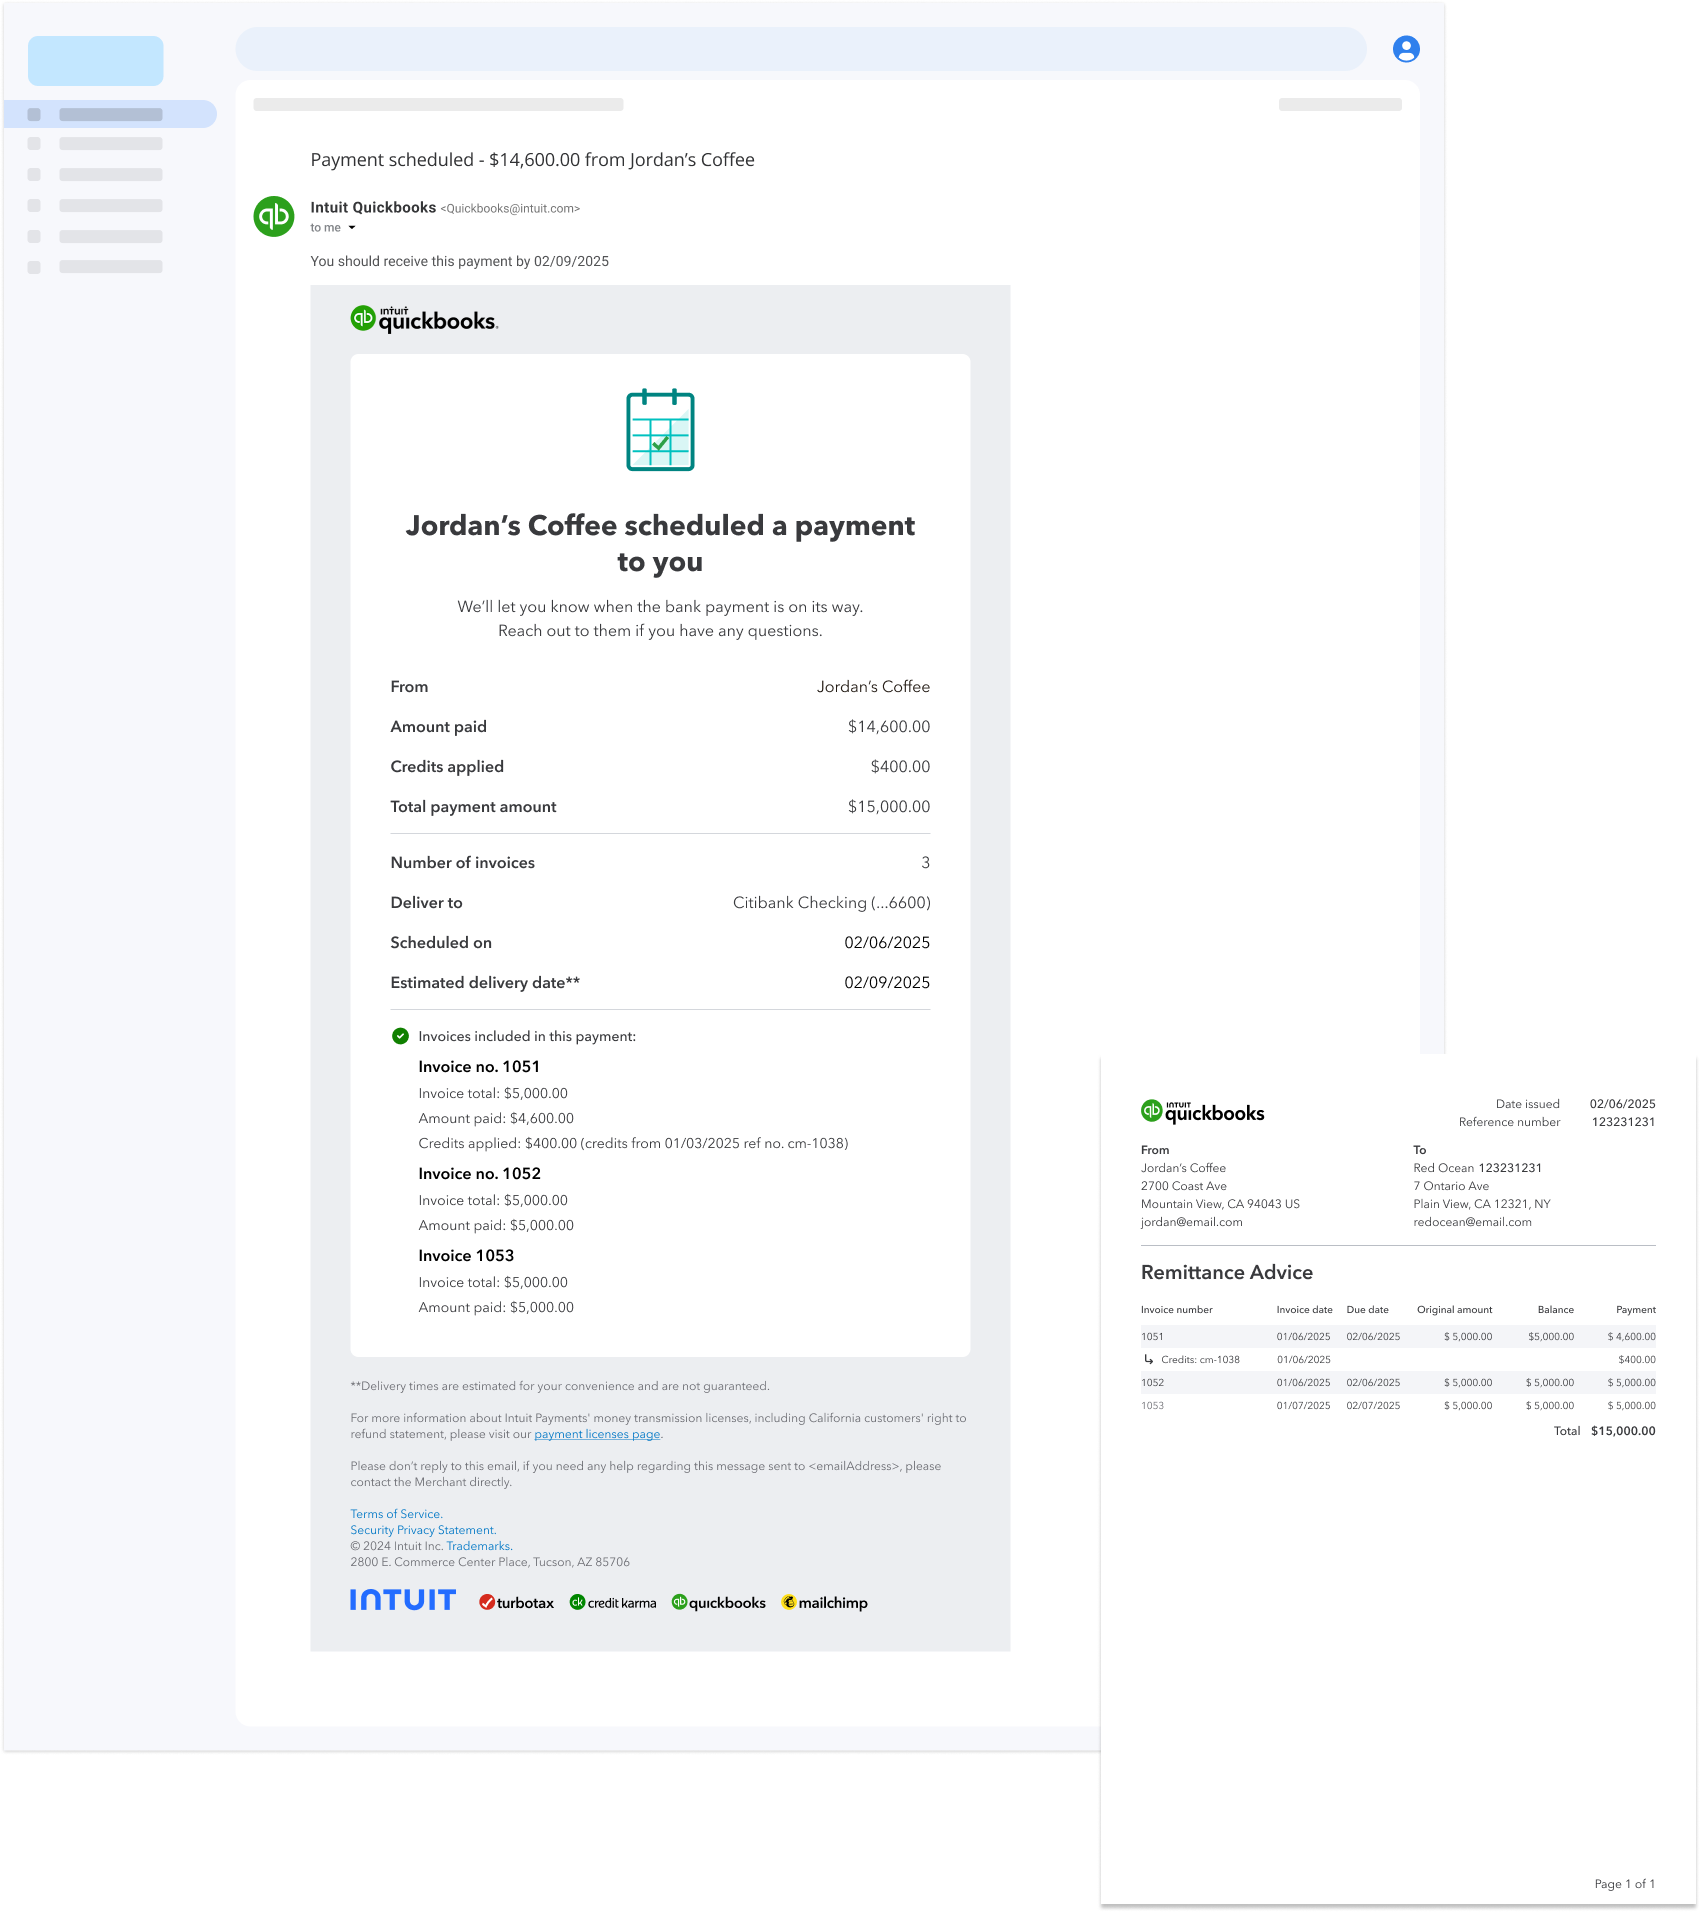
In the V1 flow, Jordan picks a few bills from Barnett Design, and can choose specific credits to apply to each bill. There’s no smart logic or auto-apply setting yet, so we give her control without all of the automation. From there, she moves into the schedule payment flow, where, for V1, the applied credits are shown but not yet editable. The scheduled amounts and applied credits carry all the way through, the summary drawer, the post-payment confirmation, the payments and status pages, the emails, and out to the vendor as automatic remittance.
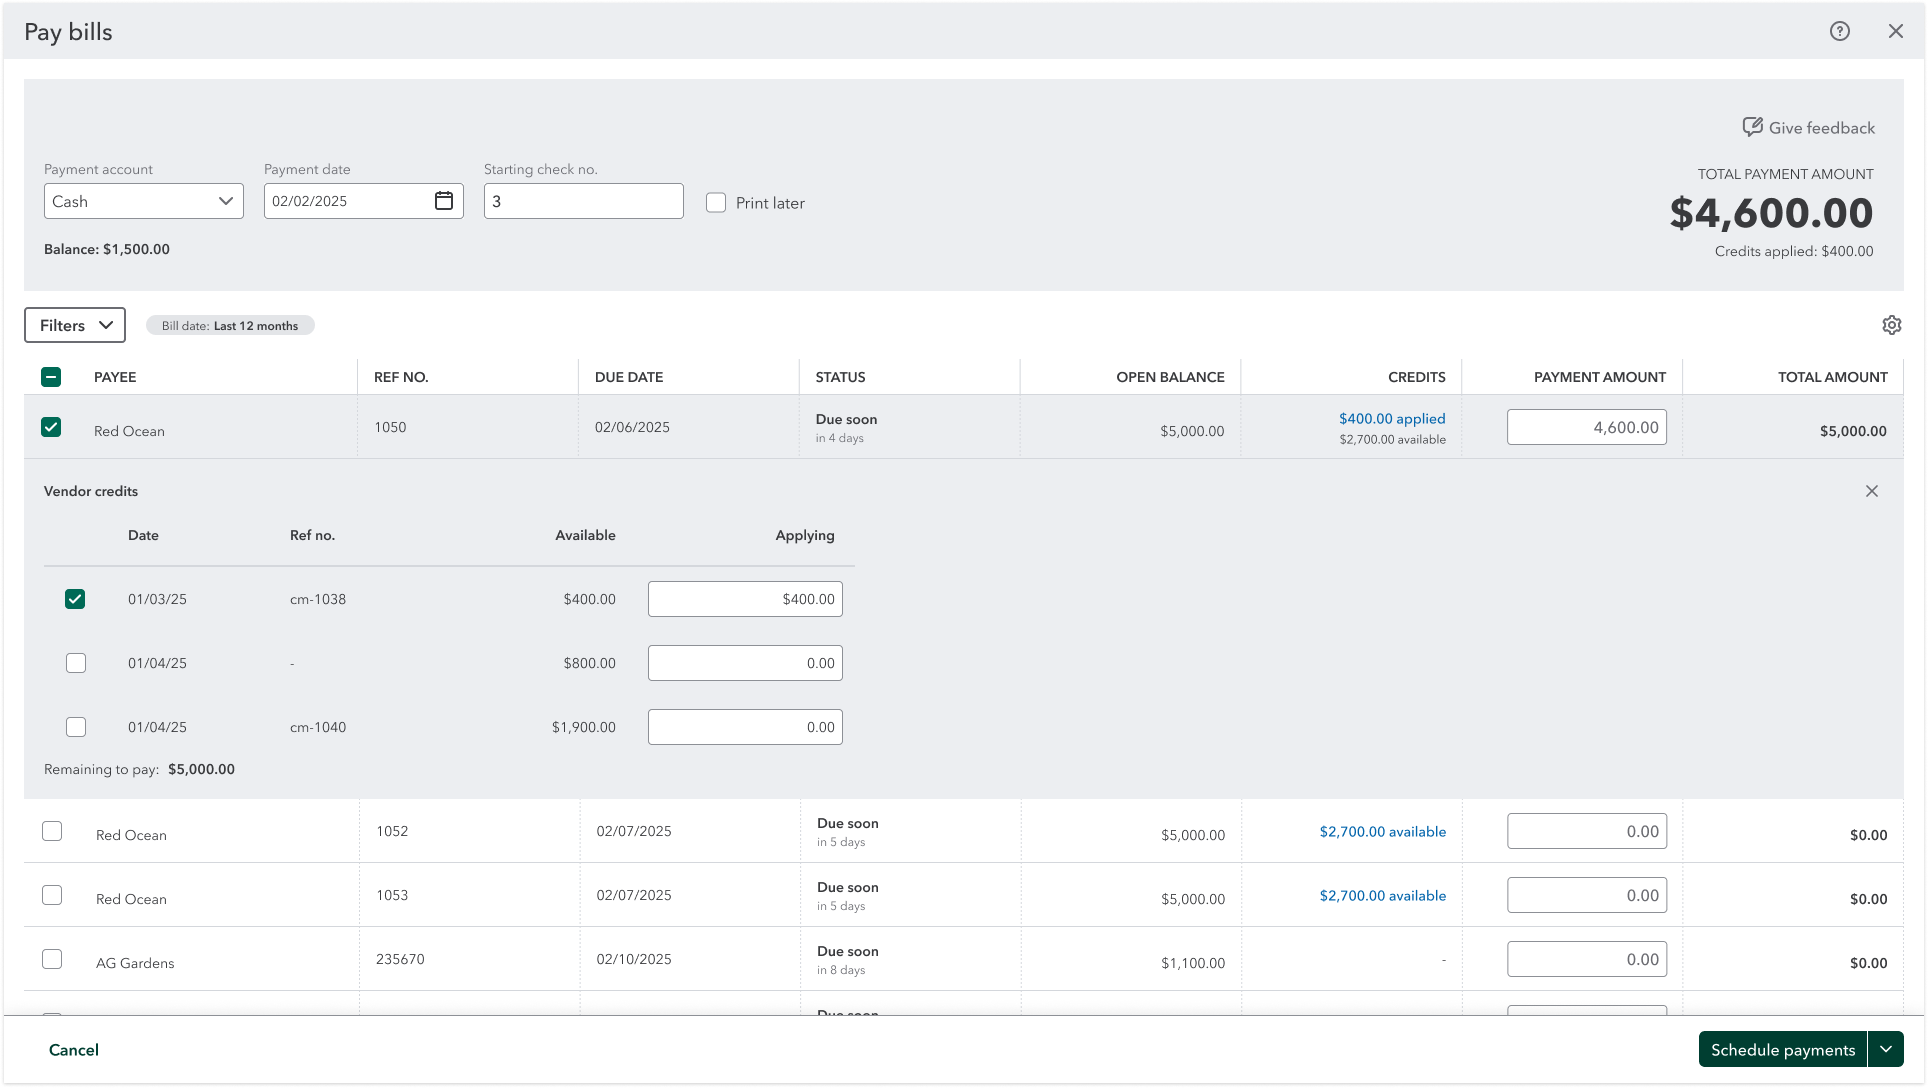
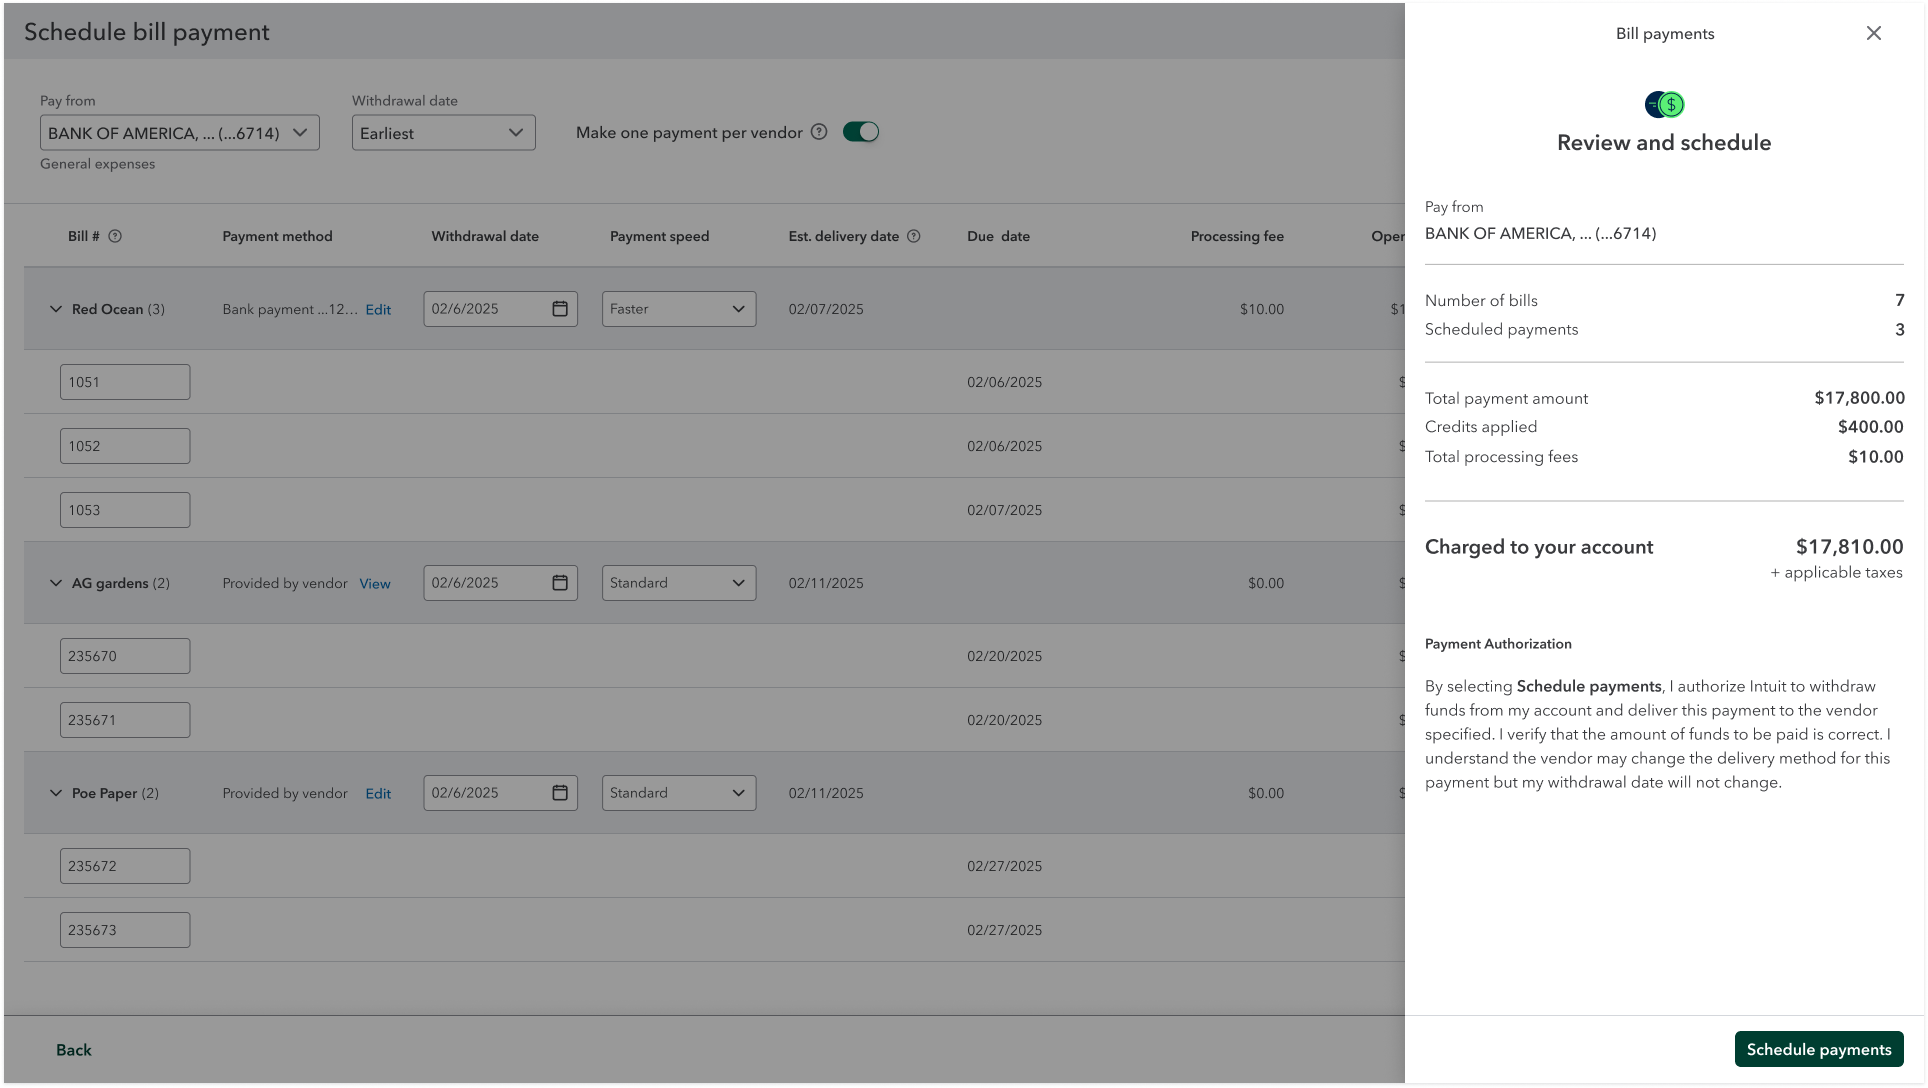
Here, we had to make some concrete choices: are the credits part of the payment, or are they a separate thing? What happens if the payment is cancelled? What’s the behavior for payment approvals? How do we show the credits across all the surfaces that currently show the payments, the payment summary, the confirmation screen, the payments and status pages, the emails? And what happens across all the edge cases?
Here, as well, we leaned on data, VOC, and interviews with accountants to guide our decisions: for example, which component will hold the credits (a drawer, a table row, a popover), how the user would know which specific credits they are choosing, and what we show about each credit to help them identify it and understand how the application works. Claude prototypes helped us again to decide on the best experience.
Once the model and system were locked, I could apply this across the many different surfaces, making sure each user sees what they need to see so the math holds up: how much the bill was, which credit was applied and how much, and how much money was sent via Bill Pay on top of the credit.
Whatever we learn from this version will feed into defining the next one, each step moving toward the full target state: a seamless experience for creating and applying a vendor credit, then sending clear remittance advice to the vendor, all without a single workaround.